Today, we’ll guide you through integrating DOTS Address Validation 4 US (AV4) into C# applications using .NET Core and Razor Pages. AV4, the latest version of our address validation service, builds on the foundation of Address Validation 3, offering enhanced features and flexible integration as a RESTful or SOAP service to fit various development environments.
AV4 not only validates addresses but also transforms unstandardized entries into standardized, deliverable addresses, using the latest USPS data. Beyond basic corrections, AV4 provides rich address details—parsing and returning components like Private Mailbox (PMB) numbers, directional indicators, county and state codes, and more. This comprehensive parsing ensures each part of the address is precise and actionable.
In addition to verifying and correcting addresses, AV4 flags ambiguous entries when no clear match is found. The service offers three validation modes, which are selected based on your specific data needs. Although this blog will focus on integration, you can learn more about these modes in this blog here.
As the latest version, AV4 also incorporates advanced functionality to locate difficult-to-validate addresses using additional data sets. Integration is simplified with our OpenAPI specification, making it easier to get your code up and running. The steps in this blog will walk you through setting up a new project in Visual Studio for seamless integration with AV4. “ASP.NET Core Web App (Razor Pages)”
-
Right click on “Connected Service” and then select “Manage Connected Services”.

-
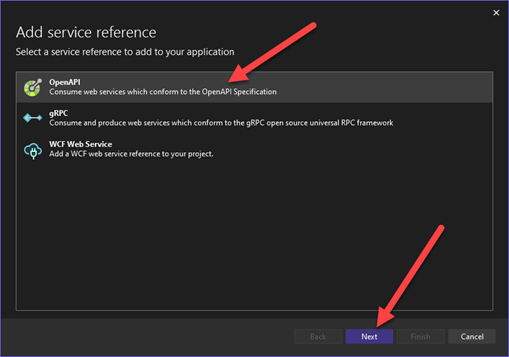
When you do that you’ll see the middle pane opens up and gives you an option to add Service References: OpenAPI, gRPC, WCF Web Service. Click on the “+” option to the right and select “OpenAPI” and click “Next”.

-
On the following screen you’ll want to hit the URL Radio button and set it to https://strial.serviceobjects.com/AV4/openapi/v1/AV4.json. The only other thing you’ll want to do is set “Provide the class name for the generated code”, for my demo I just used “AV4”. After that just hit the “Finish” button. The supporting code will get generated from that.
The code that gets generated are all the class representations of the API objects, mechanisms for serialization and deserialization, pre API call checks, exception handling and the call to the API itself.
-
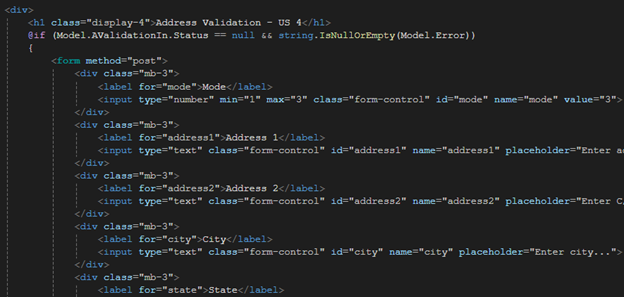
Next, we’ll want to set up our project to take user inputs from via the UI and html elements. What page you put that on doesn’t really matter and how you get your input to the API call doesn’t really matter either. In this demonstration, we are showing how you can gather user inputs from the UI and process them, but other scenarios are just as valid like reading in a CSV file with addresses or pulling in addresses from a database.
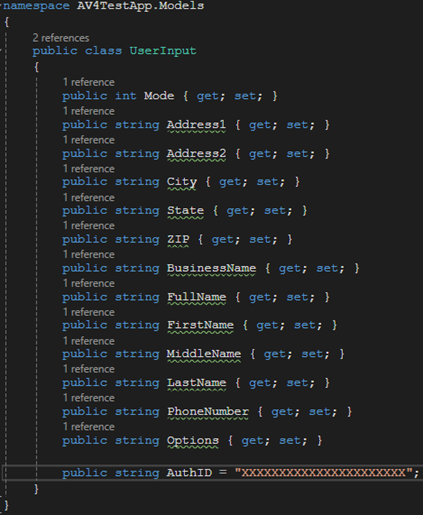
I’m also not doing much with styling and just letting bootstrap handle most of it. Here’s a sample of what that looks like for me. I also made a UserInput class and tied it to the page to make it easy to use the data entry later.
-
The input fields that you’ll want to use can be found in our developer guides here. Now depending on your use case, you may not need all of these inputs. For instance, if you intend to run everything on Mode 1, you won’t need anything but the Mode value, Address and BusinessName (if needed). You will need AuthID but this will be added behind the scenes directly in the UserInput class but better yet pulled from a config file, so no one steals your license key.
AuthID is the license key distributed to you. It can either be a production key or a trial key but they have to be used in the correct environments. A trial key will not work in our production environment and a production key will not work in our trial environment. Make note that production keys will work in our backup environments.
-
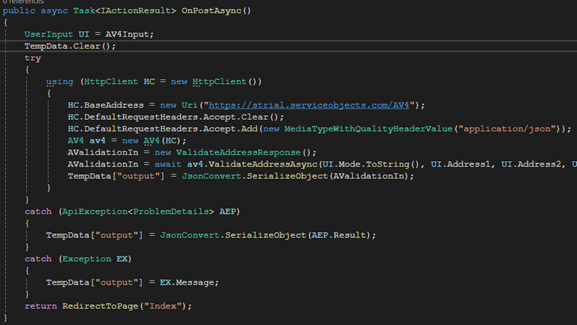
Next, you will want to make the call to the service. To make the call you’ll want to create an AV4 instance by passing to it an HTTP Client. The HttpClient will need the base address set. In my example I set it to strial for testing my trial key. In production this will need to be set to sws. The full base address in production will be: https://sws.serviceobjects.com/AV4.
Once you have that set you’re ready to make the call to the service. Start by calling av3.ValidateAddressAsync with await decorating the front of the call. Using await will also get you the more precise exception type when exceptions occur. Without await your exception will be wrapped in the AggregateExeption instead of the ApiException. When there is an issue, the ApiException will hold the AV4 ProblemDetails class that contains the information about the error.
After the call to the API, I persist the result by pushing a serialized version of it to a session variable “TempData” so I can grab the value later as the page reloads. I reused the same page for the inputs and outputs, but again, you can do this how you like. Often in real world scenarios, the result will make its way to a CSV output file or to a database table. We recommend storing everything you get back from the API calls.
I don’t have it in this example but if you get a 401 or 500 server error you will want to call our failover endpoint: https://swsbackup.serviceobjects.com/AV4. This will help ensure five nines of uptime.
-
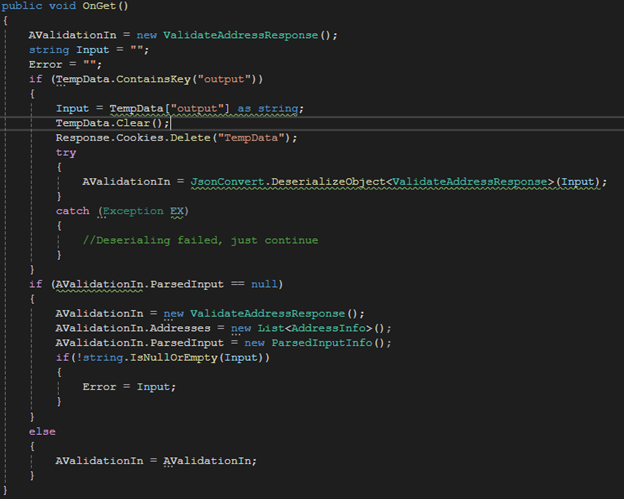
Now we are going to work on processing the response. After this code executes it calls the main Index page again, pulls in the session variable “TempData” and deserializes it back to the ValidateAddressResponse object. Here we evaluate if we should show the inputs, results or errors to the UI.
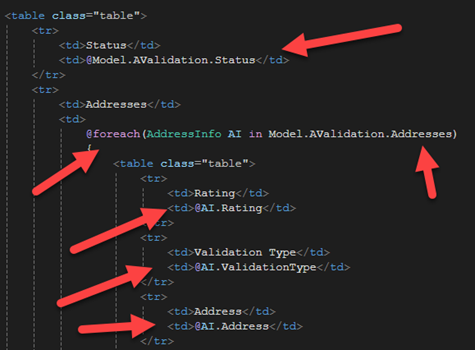
The AValidation object is tied the model of the page making it and it’s properties available in the Razor pages. I display everything in a simple table styled with bootstrap. First, I display the status and then loop through all the addresses that were returned.
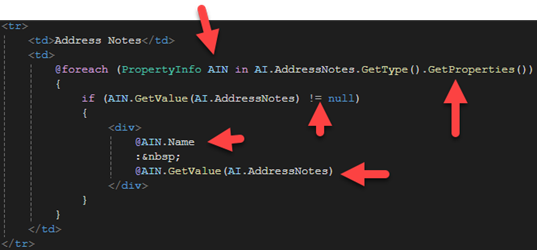
Each element in the address array will also have an AddressNotes object where only the items that are not null should be displayed. I use reflection and iterate over the properties to get their names and evaluate their values like this.
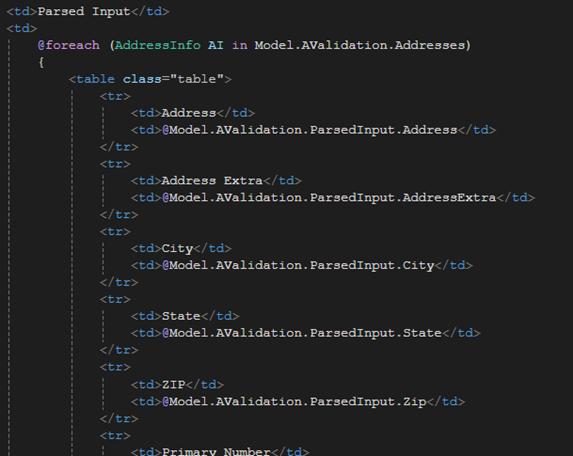
The ParsedInput part of the response object can be handled in a similar way like this.
There you have it, that’s how to get going with injecting address validation into your project. More often then not, your UI will be much different for your use case, the main point here was learning how to quickly add the OpenAPI specification for Address Validation US – 4 and how to call the API. There are many ways to get going, we also how a NuGet package that can be installed into your project which further simplifies the setup and handles failover automatically.


